Thursday, August 30, 2012

Summer Fun

So we've spent the summer sailing in Howe Sound and English Bay. 
Here's a few highlights

I think we were first to cross the line at the start of the VRC Ken & Barbie race in English Bay
When Raven struggled at the QC buoy rounding, we had to luff and back-winded the genny. With light winds, we had no option but to bail to keep going.  We came in 4th but lost 3 or 4 positions.

Avoiding "Ed" 
Finished 11th and corrected to 14th of  20

Off to a good start in the 2012 'Round Bowen Race
 but got stuck in the mud twice and ended with a DNF within 3 boat lengths of the line.

Monday, June 11, 2012

Moorage! Yahooo!

Splashed Saturday June 2 and and secured moorage the same day! Sweet!
We immediately set sail for Camp and had to turn right around due to the engine overheating.
Found the water was not able to get through the transmission.  Next morning I connected the garden hose to the transmission fitting and purged the blockage.  We went for a two hour sail in the afternoon. Great to get back on the water again.


It's a tight squeeze to get in and out, but location, location, location
The red boat Seventh Heaven directly in front of Blackheart is owned by a previous owner or Blackheart. Freaky!


'That's a wrap' time to go sailing

I've working like a busy little beaver since March and now that Junuary is almost over and summer is just around the corner, it's time to go sailing!


Cockpit lazerettes complete - teak will be added to seat tops next fall


Plenty of stowage under seats - drains into cockpit next to scuppers

Locker before bulkhead installed

Port Side Bulkhead


New Location for Head
Head Interior - vanity & cabinet to be installed next fall/spring


Head walled in - Electrical Panels
Walls to be painted white and door will be replaced with Mahogany paneled door.


Starboard side bulkhead - counter to be extended to bulkhead next fall


Monday, May 14, 2012

Battery Relocation

I've had to take a break from the incredibly frustrating fitting and shaping of the cockpit combing/lazerette backs so I've started building the battery box.

Here's only space I have available to mount enough batteries to power the new fridge.

Area under cockpit between engine and helm


I've added 2 ribs to the existing stand for the exhaust muffler and one more further aft where the bulkhead is

Here's what the final fitting

Plenty of room for 4 standard size batteries


Thursday, May 3, 2012

Cabin Filler Panel


Here's the starboard side getting the filler panel fitter for the back of the cabin.


Monday, April 2, 2012

Seat back

I've installed the port side cockpit seat back and I think it looks pretty good!  I still need to decide how I want to shape the top edge, but I've penciled in the basic shape I am considering.

Wednesday, March 28, 2012

Seat Back

We're back from our 2 weeks in Maui. Hmmm.
Anyway I've been working on the cockpit seat backs which I'm making out of unfinished 1" x 10" mahogany.  To make the transition from the cabin to the aft part of the cockpit look nice, I've decided to bend the seat backs.
I built a steam box out of plywood and hooked it up to an old paint pot with some 3/8" copper tubing and placed the pot on the side burner of the old natural gas BBQ.  Unfortunately this did not produce enough steam to properly heat the wood.
Hmmm.  After some serious mental anguish, I remembered that I had picked up a small steam cleaner from Popeye's consignment store for $5.  I hooked it up to the center of the steam box and I was off to the races.


I made a plywood pattern of the shape I cut out of the deck and traced this on to two 2x10 planks and then connected the planks with 2 x 3 forming a curved ladder.  I then placed scraps of wood on top of the mahogany and clamped it to the ladder.


Tuesday, March 6, 2012

Honduras Mahogany

I've managed to fit a new piece of mahogany into the back of the cabin where the deck section was removed.  It turned out better than I expected however the new mahogany is nowhere close to the same colour as the existing.  I'll have to find a medium brown stain to get it a little closer.


Sunday, February 19, 2012

Deck Destruction

It took all the courage I could muster, but at last I cut open my deck to for the cockpit seating.

 I've placed the cut out piece in the companionway


I've placed some plywood where the seat will be.  The greenish piece is the backrest.

Sunday, February 5, 2012

New Gusset

This weekend I managed to remove all the rotten plywood from the port cockpit locker area.


Cutting through fiberglas, plywood, screws, etc. poses the question of what tool will survive the ordeal.  I have found that a "Zip" disk in my angle drill works well for materials up to 2" thick.  In the picture below I am cutting through plywood about 2" below the deck so I don't have to deal with  replacing the teak.  I ended up cutting through 3 stainless steel screws.  A skill saw would be toast.


It's hard to see in the photo below, but I removed the majority of the gusset supporting the deck.


I left the tape on the aft side which will ensure the new piece will line up perfectly.


This is the shape of the new gusset. I'm painted all new wood with A1 penetrating epoxy.
Gusset installed 

Here's the mock-up for the lazerette stringers.  


Sunday, January 29, 2012

More Destruction

I'm continuing on with the removal of stuff that's no longer needed including the gussets that support the deck beams.  I might have left them in but, I think I will need to relocate one to the beam that ends up in the head. It will be much simpler to relocate one rather than trying to create a new one that will match.  I'll support the beam with the new beam that will be installed to support the new seats (lazerette).

Notice how cleanly the fiberglas tape came away from the hull. This has been a theme on Blackheart as everything I have removed has come off with a bit of prying. Saved a lot of sanding time.  I believe the tape was applied over top of the hull glass without de-waxing or sanding.  Not very structurally sound!


 The lower half of the cockpit walls are in bad condition, not much more than paint holding sawdust in place!  The damage is due to the water infiltrating at the openings for locker doors and around the gauge cluster. Rather than re-installing the mahogany locker door, I'm going to relocate the gauge cluster in that location and install a smaller water tight door next to it.


Monday, January 16, 2012

Quarter Berth Destruction

I took the plunge and have torn apart the quarter berth and the ice box in preparation for relocating the head and installing a D.C. fridge.  Total time was about 10 hours over 2 days.
Original Quarter Berth 
If you look at my previous post you will see a section showing what I have planned for the cockpit seating.
QB Stripped Out
Chart Table / Ice Box
  The chart table is 42" wide which just about takes a full size chart.  Since the laptop with charting program is my primary source, I feel I can take 12" out of the width to give more space to the head.  At 30" wide, the new chart table will allow a paper chart to be folded in half as back up to the laptop.

Ice box destruction
 I originally thought I could cut the aft end of the ice box off and make it shorter to allow enough room for the head.  It turns out that idea would have been a huge amount of work.  I'm glad I decided on the DC fridge.

Fuel Line & wiring
I've been chasing diesel smells since I purchased Blackheart and have addressed a few issues with the fuel tank venting and sealing the filler plate to the tank.  I would never have guessed that the original fuel line was routed through the insulation of the ice box.  The hose had deteriorated and leaked into the insulation where it's been sitting for who knows how many years.  I hope cleaning this up will reduce the diesel smell!!!
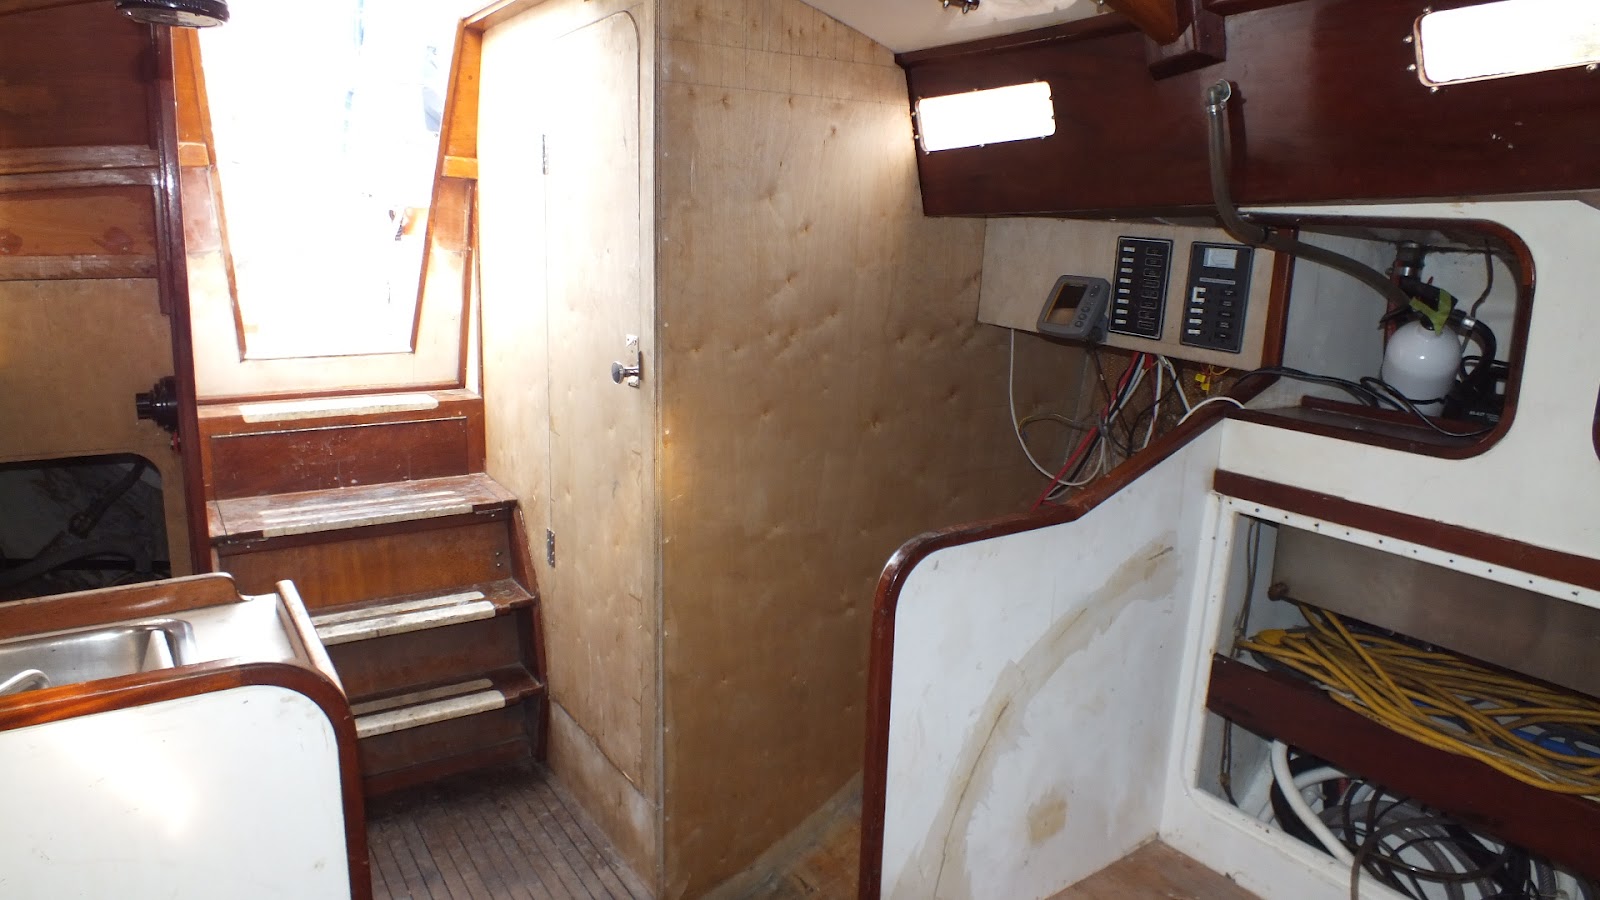
Ice Box Removed
 The new fridge will butt up to this partition with a 30" chart table above.  The head will then fit between the fridge and the back of the cabin.

Novakool RFS 7501 Freezer / Fridge
This is the Novakool (http://www.novakool.com/index.htm) DC refrigerator I will be installing.  It is a side-by-side unit and is 7.5 cubic feet.  This should be adequate for a week on the water.

Wednesday, January 11, 2012

A new year and a new plan

Sanding is almost completed in the V-berth and the saloon so painting can be done when the weather is  a bit warmer.  Really not much to show in the way of pictures.

I've re-worked the design for the the head and the cockpit seats half a dozen times, and I think I'm finally satisfied.  The plan is to remove the existing chart table (with cooler below) entirely along with the quarter berth.  The head will begin at the aft end of the cabin and run forward and take up about 1' of the chart table area, leaving about 30" for a 12volt refrigerator/freezer with a flat top counter above in place of the large chart table.  This will give me enough room in the head for a stand up shower and since we have the chart plotter along with the laptop and digital charts, the paper charts can be folded in half and still fit on the counter.  Also, the chart books we have for the Gulf Islands and Desolation Sound will fit nicely within the 30" counter space.
With such a narrow cabin, it's difficult to make anything work really well, but I'm sure this will be a huge improvement over the current head.

Once the head has been relocated, I'll just extend the galley counter aft to the back of the cabin.  This will give us an additional 20" of working counter space for food prep; right now there is only the 13" above the drawers that's really inadequate.

Section of port side cockpit seat

Plan of head and galley layout

Plan of cockpit